Cave of memories: Difference between revisions
| Line 12: | Line 12: | ||
== Daily Loot == | == Daily Loot == | ||
<div style="float: left; margin-right: | <div style="float: left; margin-left: 20px;margin-right: 20px;"> | ||
[[File:Cave entrance UI.png|left| | [[File:Cave entrance UI.png|left|540px]] | ||
</div> | </div> | ||
<p> | <p> | ||
Upon entering the cave, players can see a UI that shows what appears to be the daily loot. Every day, the Cave of Memories will randomize 3 items, 1 mushroom tree, and 2 giant crops to spawn across all floors in the cave. This means that if players want to obtain the items displayed, they should venture into the mine that day, as the daily loot will change the next day. | Upon entering the cave, players can see a UI that shows what appears to be the daily loot. Every day, the Cave of Memories will randomize 3 items, 1 mushroom tree, and 2 giant crops to spawn across all floors in the cave. This means that if players want to obtain the items displayed, they should venture into the mine that day, as the daily loot will change the next day. | ||
<br/> | <br /> | ||
List of possible items that appear in daily loot: | List of possible items that appear in daily loot: | ||
</p> | </p> | ||
| Line 26: | Line 26: | ||
{| class="wikitable mw-collapsible" style="width: 100%;" | {| class="wikitable mw-collapsible" style="width: 100%;" | ||
|- | |- | ||
! colspan="4" style="width: 100%;" |Giant Crops | ! colspan="4" style="width: 100%;" |Giant Crops | ||
|- | |- | ||
! Icon | !Icon | ||
! style="width: 20%;" | Image | ! style="width: 20%;" | Image | ||
! Name | !Name | ||
! Drops | !Drops | ||
|- | |- | ||
|[[File:Bell pepper.png|center|45x45px]] | |[[File:Bell pepper.png|center|45x45px]] | ||
| Line 78: | Line 78: | ||
{| class="wikitable mw-collapsible" style="width: 100%;" | {| class="wikitable mw-collapsible" style="width: 100%;" | ||
|- | |- | ||
! colspan="2" style="width: 100%;" |Daily Loot Items | ! colspan="2" style="width: 100%;" |Daily Loot Items | ||
|- | |- | ||
| style="width: 50%;" |{{IconNameLink|icon=555Rope.png|link=https://coralisland.wiki/wiki/Crafting#Misc_2|Name=Rope}}{{IconNameLink|icon=112Explosive Lv1.png|link=https://coralisland.wiki/wiki/Crafting#Explosive|Name=Explosive I}}{{IconNameLink|icon=144Explosive Lv2.png|link=https://coralisland.wiki/wiki/Crafting#Explosive|Name=Explosive II}}{{IconNameLink|icon=179Explosive Lv3.png|link=https://coralisland.wiki/wiki/Crafting#Explosive|Name=Explosive III}}{{IconNameLink|icon=341Vortexnator level1.png|link=https://coralisland.wiki/wiki/Crafting#Explosive|Name=Vortexanator I}}{{IconNameLink|icon=848Vortexnator II.png|link=https://coralisland.wiki/wiki/Crafting#Explosive|Name=Vortexanator II}}{{IconNameLink|icon=691Vortexnator level3.png|link=https://coralisland.wiki/wiki/Crafting#Explosive|Name=Vortexanator III}}{{IconNameLink|icon=349Chicken Decoy trap.png|link=https://coralisland.wiki/wiki/Crafting#Combat|Name=Decoy}}{{IconNameLink|icon=417Glue trap.png|link=https://coralisland.wiki/wiki/Crafting#Combat|Name=Glue Trap}}{{IconNameLink|icon=485Fertilizer 3.png|link=https://coralisland.wiki/wiki/Crafting#Farming_Tools|Name=Fertilizer III}}{{IconNameLink|icon=664Hydro 3.png|link=https://coralisland.wiki/wiki/Crafting#Farming_Tools|Name=Hydro III}}{{IconNameLink|icon=562Flash 3.png|link=https://coralisland.wiki/wiki/Crafting#Farming_Tools|Name=Flash III}}{{IconNameLink|icon=344Ball of Goop.png|link=https://coralisland.wiki/wiki/Crafting#Consumables|Name=Ball of Goop}}{{IconNameLink|icon=315Stew.png|link=https://coralisland.wiki/wiki/Stew|Name=Stew}}{{IconNameLink|icon=535Green Curry.png|link=https://coralisland.wiki/wiki/Green_curry|Name=Green Curry}}{{IconNameLink|icon=Solar Fragment.png|link=https://coralisland.wiki/wiki/Crafting#Misc_2|Name=Solar fragment}}{{IconNameLink|icon=Mysterious node.png|link=https://coralisland.wiki/wiki/Auto_Chest|Name=Mysterious Node}} | | style="width: 50%;" |{{IconNameLink|icon=555Rope.png|link=https://coralisland.wiki/wiki/Crafting#Misc_2|Name=Rope}}{{IconNameLink|icon=112Explosive Lv1.png|link=https://coralisland.wiki/wiki/Crafting#Explosive|Name=Explosive I}}{{IconNameLink|icon=144Explosive Lv2.png|link=https://coralisland.wiki/wiki/Crafting#Explosive|Name=Explosive II}}{{IconNameLink|icon=179Explosive Lv3.png|link=https://coralisland.wiki/wiki/Crafting#Explosive|Name=Explosive III}}{{IconNameLink|icon=341Vortexnator level1.png|link=https://coralisland.wiki/wiki/Crafting#Explosive|Name=Vortexanator I}}{{IconNameLink|icon=848Vortexnator II.png|link=https://coralisland.wiki/wiki/Crafting#Explosive|Name=Vortexanator II}}{{IconNameLink|icon=691Vortexnator level3.png|link=https://coralisland.wiki/wiki/Crafting#Explosive|Name=Vortexanator III}}{{IconNameLink|icon=349Chicken Decoy trap.png|link=https://coralisland.wiki/wiki/Crafting#Combat|Name=Decoy}}{{IconNameLink|icon=417Glue trap.png|link=https://coralisland.wiki/wiki/Crafting#Combat|Name=Glue Trap}}{{IconNameLink|icon=485Fertilizer 3.png|link=https://coralisland.wiki/wiki/Crafting#Farming_Tools|Name=Fertilizer III}}{{IconNameLink|icon=664Hydro 3.png|link=https://coralisland.wiki/wiki/Crafting#Farming_Tools|Name=Hydro III}}{{IconNameLink|icon=562Flash 3.png|link=https://coralisland.wiki/wiki/Crafting#Farming_Tools|Name=Flash III}}{{IconNameLink|icon=344Ball of Goop.png|link=https://coralisland.wiki/wiki/Crafting#Consumables|Name=Ball of Goop}}{{IconNameLink|icon=315Stew.png|link=https://coralisland.wiki/wiki/Stew|Name=Stew}}{{IconNameLink|icon=535Green Curry.png|link=https://coralisland.wiki/wiki/Green_curry|Name=Green Curry}}{{IconNameLink|icon=Solar Fragment.png|link=https://coralisland.wiki/wiki/Crafting#Misc_2|Name=Solar fragment}}{{IconNameLink|icon=Mysterious node.png|link=https://coralisland.wiki/wiki/Auto_Chest|Name=Mysterious Node}} | ||
| style="width: 50%;" |{{IconNameLink|icon=Small Blue Mushroom Floor Lamp.png|link=https://coralisland.wiki/wiki/Indoor_Decor#Mushroom_Style|Name=Small Blue Mushroom Floor Lamp}}{{IconNameLink|icon=Tall Blue Mushroom Floor Lamp.png|link=https://coralisland.wiki/wiki/Indoor_Decor#Mushroom_Style|Name=Tall Blue Mushroom Floor Lamp}}{{IconNameLink|icon=Small Red Mushroom Floor Lamp.png|link=https://coralisland.wiki/wiki/Indoor_Decor#Mushroom_Style|Name=Small Red Mushroom Floor Lamp}}{{IconNameLink|icon=Tall Red Mushroom Floor Lamp.png|link=https://coralisland.wiki/wiki/Indoor_Decor#Mushroom_Style|Name=Tall Red Mushroom Floor Lamp}}{{IconNameLink|icon=Small Yellow Mushroom Lamp.png|link=https://coralisland.wiki/wiki/Indoor_Decor#Mushroom_Style|Name=Small Yellow Mushroom Lamp}}{{IconNameLink|icon=Small White Mushroom Decor.png|link=https://coralisland.wiki/wiki/Indoor_Decor#Mushroom_Style|Name=Small White Mushroom Decor}}{{IconNameLink|icon=Big White Mushroom Decor.png|link=https://coralisland.wiki/wiki/Indoor_Decor#Mushroom_Style|Name=Big White Mushroom Decor}}{{IconNameLink|icon=Small white mushroom outdoor decor.png|link=https://coralisland.wiki/wiki/Outdoor_Decor#Mushroom_Style|Name=Small white mushroom outdoor decor}}{{IconNameLink|icon=White mushroom decor.png|link=https://coralisland.wiki/wiki/Outdoor_Decor#Mushroom_Style|Name=White mushroom decor}}{{IconNameLink|icon=Large white mushroom decor.png|link=https://coralisland.wiki/wiki/Outdoor_Decor#Mushroom_Style|Name=Large white mushroom decor}}{{IconNameLink|icon=Twin white mushroom decor.png|link=https://coralisland.wiki/wiki/Outdoor_Decor#Mushroom_Style|Name=Twin white mushroom decor}}{{IconNameLink|icon=Blue mushroom lantern.png|link=https://coralisland.wiki/wiki/Outdoor_Decor#Mushroom_Style|Name=Blue mushroom lantern}}{{IconNameLink|icon=Leaf decor.png|link=https://coralisland.wiki/wiki/Outdoor_Decor#Mushroom_Style|Name=Leaf decor}}{{IconNameLink|icon=Large leaf decor.png|link=https://coralisland.wiki/wiki/Outdoor_Decor#Mushroom_Style|Name=Large leaf decor}}{{IconNameLink|icon=Mystery geode.png|link=https://coralisland.wiki/wiki/Gem#:~:text=also%C2%A0%3A%20Museum%20Donation-,Geode,-%5Bedit%20%7C|Name=Mysterious Geode}}{{IconNameLink|icon=Mysterious coffer.png|link=https://coralisland.wiki/wiki/Artifact#:~:text=also%C2%A0%3A%20Museum%20Donation-,Coffer,-%5Bedit%20%7C|Name=Mysterious Coffer}} | | style="width: 50%;" |{{IconNameLink|icon=Small Blue Mushroom Floor Lamp.png|link=https://coralisland.wiki/wiki/Indoor_Decor#Mushroom_Style|Name=Small Blue Mushroom Floor Lamp}}{{IconNameLink|icon=Tall Blue Mushroom Floor Lamp.png|link=https://coralisland.wiki/wiki/Indoor_Decor#Mushroom_Style|Name=Tall Blue Mushroom Floor Lamp}}{{IconNameLink|icon=Small Red Mushroom Floor Lamp.png|link=https://coralisland.wiki/wiki/Indoor_Decor#Mushroom_Style|Name=Small Red Mushroom Floor Lamp}}{{IconNameLink|icon=Tall Red Mushroom Floor Lamp.png|link=https://coralisland.wiki/wiki/Indoor_Decor#Mushroom_Style|Name=Tall Red Mushroom Floor Lamp}}{{IconNameLink|icon=Small Yellow Mushroom Lamp.png|link=https://coralisland.wiki/wiki/Indoor_Decor#Mushroom_Style|Name=Small Yellow Mushroom Lamp}}{{IconNameLink|icon=Small White Mushroom Decor.png|link=https://coralisland.wiki/wiki/Indoor_Decor#Mushroom_Style|Name=Small White Mushroom Decor}}{{IconNameLink|icon=Big White Mushroom Decor.png|link=https://coralisland.wiki/wiki/Indoor_Decor#Mushroom_Style|Name=Big White Mushroom Decor}}{{IconNameLink|icon=Small white mushroom outdoor decor.png|link=https://coralisland.wiki/wiki/Outdoor_Decor#Mushroom_Style|Name=Small white mushroom outdoor decor}}{{IconNameLink|icon=White mushroom decor.png|link=https://coralisland.wiki/wiki/Outdoor_Decor#Mushroom_Style|Name=White mushroom decor}}{{IconNameLink|icon=Large white mushroom decor.png|link=https://coralisland.wiki/wiki/Outdoor_Decor#Mushroom_Style|Name=Large white mushroom decor}}{{IconNameLink|icon=Twin white mushroom decor.png|link=https://coralisland.wiki/wiki/Outdoor_Decor#Mushroom_Style|Name=Twin white mushroom decor}}{{IconNameLink|icon=Blue mushroom lantern.png|link=https://coralisland.wiki/wiki/Outdoor_Decor#Mushroom_Style|Name=Blue mushroom lantern}}{{IconNameLink|icon=Leaf decor.png|link=https://coralisland.wiki/wiki/Outdoor_Decor#Mushroom_Style|Name=Leaf decor}}{{IconNameLink|icon=Large leaf decor.png|link=https://coralisland.wiki/wiki/Outdoor_Decor#Mushroom_Style|Name=Large leaf decor}}{{IconNameLink|icon=Mystery geode.png|link=https://coralisland.wiki/wiki/Gem#:~:text=also%C2%A0%3A%20Museum%20Donation-,Geode,-%5Bedit%20%7C|Name=Mysterious Geode}}{{IconNameLink|icon=Mysterious coffer.png|link=https://coralisland.wiki/wiki/Artifact#:~:text=also%C2%A0%3A%20Museum%20Donation-,Coffer,-%5Bedit%20%7C|Name=Mysterious Coffer}} | ||
|} | |} | ||
| Line 87: | Line 87: | ||
{| class="wikitable mw-collapsible" style="width: 100%;" | {| class="wikitable mw-collapsible" style="width: 100%;" | ||
|- | |- | ||
! colspan="3" style="width: 100%;" |Mushroom Tree | ! colspan="3" style="width: 100%;" |Mushroom Tree | ||
|- | |- | ||
! Icon | !Icon | ||
! style="width: 20%;" | Image | ! style="width: 20%;" |Image | ||
! Name | !Name | ||
|- | |- | ||
|[[File:Mushroom tree seed.png|center|45x45px]] | |[[File:Mushroom tree seed.png|center|45x45px]] | ||
|[[File:Mushroom tree.png|center|frameless|80x80px]] | |[[File:Mushroom tree.png|center|frameless|80x80px]] | ||
|Mushroom tree | | Mushroom tree | ||
|- | |- | ||
|[[File:Moonspore tree seed.png|center|45x45px]] | |[[File:Moonspore tree seed.png|center|45x45px]] | ||
| Line 122: | Line 122: | ||
*This section spawn yellow stone debris, which drops [[Artifact|Coffer]]. | *This section spawn yellow stone debris, which drops [[Artifact|Coffer]]. | ||
*All kinds of ore veins spawn more in this section. | *All kinds of ore veins spawn more in this section. | ||
*Checkpoint at floor 25, the chest contains {{Icon|Strawberry}} | *Checkpoint at floor 25, the chest contains {{Icon|Strawberry}} | ||
|} | |} | ||
{| | {| | ||
|[[File:Happy theme floor.png|left|thumb|400x400px|Happy Theme Environment]] | |[[File:Happy theme floor.png|left|thumb|400x400px|Happy Theme Environment]] | ||
| style="padding-left: 10px;" | | | style="padding-left: 10px;" | | ||
===Floor 26-50=== | ===Floor 26-50=== | ||
<hr> | <hr> | ||
*This section spawn blue stone debris, which drops [[Gem|geode]]. | * This section spawn blue stone debris, which drops [[Gem|geode]]. | ||
*Giant fruit spawn more in this section. | *Giant fruit spawn more in this section. | ||
*Treasure floor spawn more in this section. | *Treasure floor spawn more in this section. | ||
*Checkpoint at floor 50, the chest contains {{Icon|Strawberry}} | *Checkpoint at floor 50, the chest contains {{Icon|Strawberry}} | ||
|} | |} | ||
{| | {| | ||
|[[File:Evil theme floor.png|left|thumb|400x400px|Evil Theme Environment]] | |[[File:Evil theme floor.png|left|thumb|400x400px|Evil Theme Environment]] | ||
| style="padding-left: 10px;" | | | style="padding-left: 10px;" | | ||
===Floor 51-75=== | ===Floor 51-75 === | ||
<hr> | <hr> | ||
*This section spawn red stone debris, which drops [[Fossil|fossil node]]. | *This section spawn red stone debris, which drops [[Fossil|fossil node]]. | ||
*Cactus spawn more here | *Cactus spawn more here | ||
* Monster floor spawn more here | *Monster floor spawn more here | ||
*Checkpoint at floor 75, the chest contains {{Icon|Strawberry}} | * Checkpoint at floor 75, the chest contains {{Icon|Strawberry}} | ||
|} | |} | ||
Revision as of 09:33, 17 July 2024
The Cave of Memories is a mysterious cave located within the Savannah. It is suspected to be the dwelling place of the giant Grog. Players must gather Grog's memory fragments to uncover the true story of what happened to the giants. To unlock the Cave of Memories, players must complete specialty-based altars at the Temple Offering.
Unlike the mines in Starlet Town, the Cave of Memories has only 5 checkpoints, located every 25th floor. The final checkpoint is at floor 125, beyond which the journey continues infinitely deeper. Players can collect various resources in the cave, including ores, fossil nodes, geodes, and coffers. The deeper players go, the rarer and more valuable the resources they can find. Here, player can also encounter Mushroom rocks & Mushroom trees, which require an axe to chop. Mushroom rocks & trees can also be destroyed using explosives. Resources found in the cave are essential for crafting, upgrading equipment, and helping player complete the museum collection.
Daily Loot
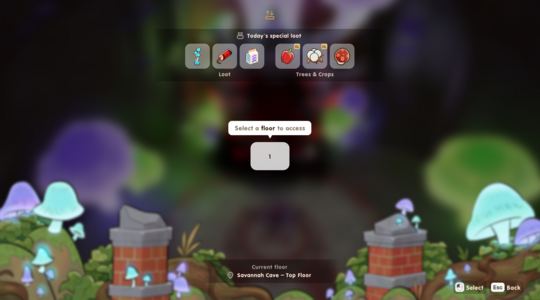
Upon entering the cave, players can see a UI that shows what appears to be the daily loot. Every day, the Cave of Memories will randomize 3 items, 1 mushroom tree, and 2 giant crops to spawn across all floors in the cave. This means that if players want to obtain the items displayed, they should venture into the mine that day, as the daily loot will change the next day.
List of possible items that appear in daily loot:
| Giant Crops | |||
|---|---|---|---|
| Icon | Image | Name | Drops |
| Giant potato |
| ||
| Giant potato |
| ||
| Giant pumpkin |
| ||
| Giant red cabbage |
| ||
| Giant cotton |
| ||
| Giant starfruit |
| ||
| Giant strawberry |
| ||
| Giant watermelon |
| ||
| Daily Loot Items | |
|---|---|
Environment
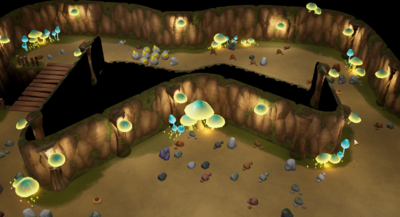
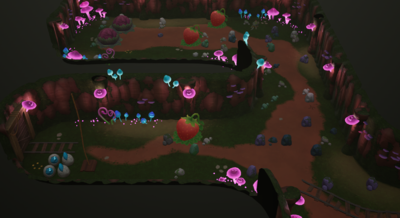
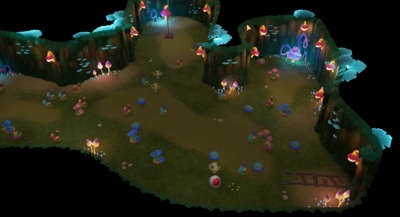
As players journey through the first three checkpoints, they'll encounter unique themes: Neutral, Happy, and Evil. These themes are visually represented by mushrooms; pale yellow for Neutral, pink for Happy, and a striking mix of red and purple for Evil. Beyond floor 75, the themes players encounter will be randomized. Each section, marked by checkpoints, also offers increased spawn rates for specific loot. Each time player unlock a checkpoint, a cutscene will play out. Player can get Grog's memory fragment after the cutscene.
Floor 1-25
|
Floor 26-50
|
Floor 51-75
|


